How to make PDF forms accessible
What this document is for
PDF forms should be accessible to users of accessible technology (AT). AT CCD, when we say “accessible” we use a broad definition that considers:
- Concepts like information hierarchy, plain language, and common sense
- Standards like PDF/UA, WCAG, and Section 508
This document is a step-by-step guide to bring your PDF forms up to the PDF standards above.
General info and tips
- Start from these files.
- Always use styles for paragraph, character, and object.
- When you can, copy and paste objects instead of creating new ones.
- Toggle the visibility of the baseline grid by going to View > Grids & guides > Hide baseline grid.
- Toggle between Normal and Preview mode with the W key.
- Become familiar with the Buttons and forms panel (Window > Interactive > Buttons and forms) and add it to your workspace. This is where you make objects interactive using the dropdown menu under Type (generally already done for you in the template). It’s also where you’ll customize the interactive features and do a lot of the accessibility work.
Specific information on tool tips
- All accessible components require a description (sometimes called a tool tip). Many AT users will use something called “forms mode”, which ignores everything on the form except for the accessible components and their tool tips. This means that tool tips must:
- Accurately describe what exactly the voter must enter
- Be as short and plain as possible
- Contain all the necessary context
- Always write “required” at the end of the tool tip if the field is required.
- Use descriptive tool tips instead of example tool tips. For example, for a phone number field, write 9-digit phone number, not (123) 555-9876.
- Always spell out all tool tips. For example, write out social security number, not SSN.
Table of contents
Section 1. Accessible text fields, check boxes, radio buttons, and hyperlinks
Section 2. Control reading orders
Section 3. Final steps and export
Section 4. Cleanup and checking your work in Acrobat
Section 5. Accessible PDF form checklist
Section 6. Downloadable InDesign form templates
Section 7. Resource recommendations for learning InDesign
Section 1.
Accessible form fields, check boxes, radio buttons, and hyperlinks
Form fields
Form fields overview
Form fields are where voters enter their information like their name or address. The templates include 2 design options for form fields. They are made up of 3 components:
- Label – The text that tells voters what information to enter
- Field line or rectangle – The visual component that shows sighted voters where to enter the information
- Text field – The interactive component of the form field that allows voters to type in their information. It also contains important accessibility information that tells an AT user what to enter.
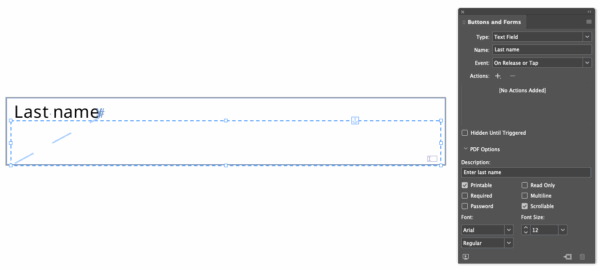
Making text fields accessible
- Open the Buttons and forms panel.
- Select the text field. If it’s grouped with the field line, double-click it so that you’re only selecting the text field.
- In the Buttons and forms panel, under Name, write what it says in the label (e.g., Last name).
- Note: The name isn’t important for accessibility. It’s just for you to stay organized.
- Note: Always make sure every field has a unique name. If 2 fields have the same name, when the user types in one, the same text will appear in the other field too.
- In Description, write a short tool tip that you want AT to announce. See the previous section for specific information on tool tips
- Repeat for all text fields
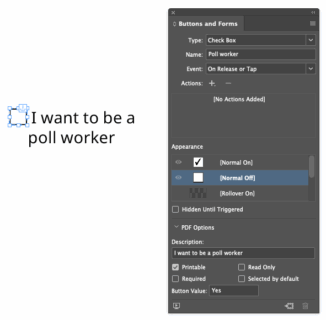
Check boxes
Use check boxes when you want to let the voter choose more than 1 option.
Check boxes are squares (drawn with the rectangle tool) that are anchored before their labels. Always try to keep every check box in a series in the same text frame. If you can’t, thread your text frames.
Making check boxes accessible
- Open the Buttons and forms panel.
- Select the check box.
- In Buttons and forms, under Name, write what it says in the label.
- In Description, write a short tool tip.
- In Button Value, write what it says in the label.
- Repeat for all check boxes
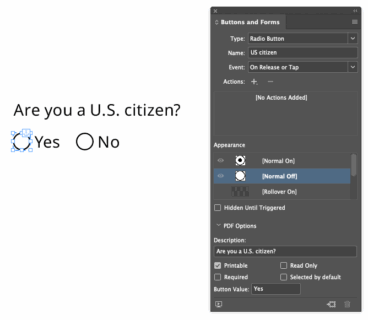
Radio buttons
Use radio buttons when you want to restrict the voter to only 1 option.
Radio buttons are just like check boxes but they are circles.
Making radio buttons accessible
- Open the Buttons and forms panel.
- Select the radio button.
- In Buttons and forms, under Name, write a name for the whole series of radio buttons. Every radio button in the series must have the same name.
- In Description, write a short tool tip for the whole series of radio buttons. Every radio button in the series must have the same description.
- In Button Value, write what it says in the label.
- Note: You can write the description and button values in a way that makes them flow better. Example:
Description: I want to vote
Button values: By mail, Early in person, In person on Election day
- Note: You can write the description and button values in a way that makes them flow better. Example:
- Repeat for all radio buttons.
Signature sections
Signature sections have 2 objects: the “X” box and the signature field. If E-signatures are allowed, use an accessible signature field.
Making signature fields accessible
Making a signature field accessible is just like making a text field accessible.
If the form doesn’t allow e-signatures, follow these steps:
- Convert the signature field back into a regular object.
- Open the Buttons and forms panel.
- Select the signature field.
- Select the Convert to object button at the bottom of the Buttons and forms panel.
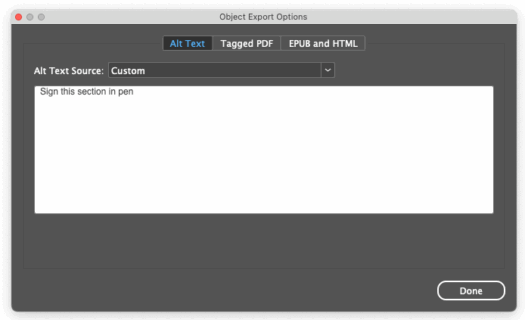
- Give the signature field alt text
- Right-click on the signature field and go to Object export options.
- Under Alt text source, choose Custom.
- In the box type “sign this section in pen” or similar.
Hyperlinks
Making hyperlinks accessible helps AT users navigate from your PDF to the web or other sections in the PDF.
Making hyperlinks accessible
- Open the Hyperlinks panel (Window > Interactive > Hyperlinks).
- Highlight the URL on the page.
- Select the [+] at the bottom of the Hyperlinks panel.
- Under Appearance > Character style, set the style. (You can choose URL).
- Under Accessibility > Alt text, write a short description of the website (e.g., Homepage of the Hamilton Elections Office).
- Repeat until all URLs are hyperlinked.
Section 2.
Control reading orders
Reading order is the order that you want an AT user to consume the content—It usually mirrors a sighted user’s experience and expectations. Reading order is controlled with the Articles panel in InDesign and is reflected in the Tags panel in Acrobat
Controlling the articles panel
- Open the articles panel (Window > Articles).
- Click the hamburger menu in the upper right hand corner of the articles panel and make sure “Use for tagging order in tagged pdf” is checked.
- Drag all the content on the form into the articles panel in the order that you want AT to read the content from top-to-bottom. Follow these steps:
- Work with 1 section at a time. How you divide up the sections doesn’t matter.
- Shift-click every object in 1 section in order.
- Drag the objects together into the articles panel. Name it and make sure “Include when exporting” is checked.
Note: The name of your articles don’t matter. Name it something that’ll help you stay organized.
Note: You only have to tag meaningful content. Anything you want AT to ignore (e.g., section dividers), you can leave out of the articles panel and it will automatically be ignored by AT. - Repeat until all the content that you want AT to read is in the articles panel in the right order.

Section 3.
Final steps and export
Give the document a title
- Go to File > File info
- In Document title, name the document the title of the form.
Export the PDF
- Go to File > Export
- Set Format to Adobe PDF (Interactive) and save
- Under Options, make sure “Create tagged PDF” and “Use structure for Tab” order are checked.
- Under Viewing, you can leave ”View after exporting” checked or unchecked. When it’s checked, it’ll automatically open the PDF in Acrobat after you export.
Note: If you export a PDF, then come back to InDesign to make changes, then export the PDF again with the same name, Acrobat will not open the new version of the PDF you just exported. To get around this, always make sure you close the tab in Acrobat before you open the PDF again. - Under Advanced > Display title: set it to Document title.
Section 4.
Cleanup and checking your work in Acrobat
Checking your tags
This is where you check the work that you did in the Articles panel in InDesign.
- In Acrobat, go to View > Show/Hide > Navigation > Navigation Panes > Tags
- Click Tags at the top of the tree
- “Walk the tags tree” by navigating using the arrow keys. The right arrow key opens a section and the left arrow key closes it. You want to pay attention to 2 things:
- All meaningful content is tagged (enclosed in a pink rectangle).
- The content is in the correct reading order.
- If you find a mistake, go back to InDesign and fix it. The 2 types of mistakes and their solutions are:
- Meaningful content is not tagged—Drag the object into the articles panel.
- Content is in the wrong reading order—Reorder the content in the Articles panel (top-to-bottom).
- Repeat until all meaningful content is tagged in the correct order.
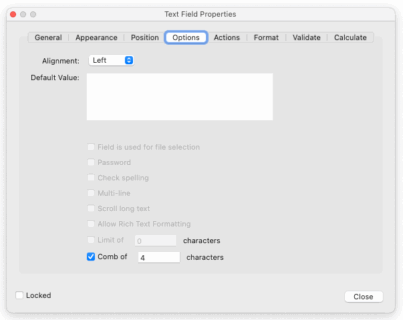
Creating combed forms
If you created a form field that limits the number of characters (e.g., last 4 of SSN, DL#, etc.), you have to customize the field in Acrobat.
- Go to View > Tools > Prepare form
- Double-click on the text field
- Under Options:
- Unclick all options
- Click “Comb of” and enter the number of characters.
- Close “Prepare form” mode and check your work by filing out the field.
- Make adjustments in InDesign as necessary, re-export the PDF, and repeat.
Note: Every time you export the PDF, you have to repeat this step for all character-limited forms.
Do an accessibility check
- Go to View > Tools > Accessibility. Double-click on Accessibility Check and click Start Checking.
- You should have only 2 issues under Document:
- Logical reading order—This is what you did when you checked your tags order. You can right-click it and Pass.
- Color contrast – If you used the color combinations in the template, they will pass WCAG AA. You can right-click it and Pass. If you added any colors, use a free color contrast analyzer to make sure that your color combinations pass basic accessibility requirements.
Test drive the whole form
Make sure your form works as you intended.
- Mouse over every form and button—The tooltip will pop up. Make sure all tooltips are correct.
- Fill the form out completely. Check every radio button and check box. Are radio buttons mutually exclusive?
- Print the form and fill it out by hand.
Section 5.
Accessible PDF form checklist
Use this checklist to make sure your PDF forms are accessible.
Accessible PDF form checklist
Use this checklist to check that your PDF form includes everything outlined in the technical guide.
Download checklistSection 6.
InDesign templates
We’ve developed an InDesign template for accessible forms so that you can quickly and easily create new forms. This template makes it fast and easy to create masters and accessible, fillable forms at the same time.
Downloadable InDesign form template (8pt)
This template version is in 8pt font size.
Download 8pt InDesign templateDownloadable InDesign form template (11pt)
This template version is in 11pt font size.
Download 11pt InDesign templateSection 7.
Resource recommendations for learning InDesign
Creating accessible forms in InDesign is much easier if designers are already comfortable with the basics of the software. Even a little practice upfront saves time later, allowing the team to focus on accessibility and good design instead of troubleshooting tools. These resources will help you get started.
Resources for learning InDesign
View a list of our recommended resources to start learning InDesign.
Resources to learn InDesign© 2025 Center for Civic Design