Voter guides: Tips for working in Word
This is not a complete tutorial on Word, but contains some general tips for working in Word using the voter guide templates.
On this page:
- How to use Word styles and headings
- How to choose fonts
- How to make images accessible
- How to place image banners in headers
- How to manage headers and footers
How to use Word styles and headings
The templates contain custom styles to manage the size, line-spacing, and other formatting in the text. Some have general names like Body, Body-bullets, and Body-list-intro. Others are formatted and named for specific uses like TOC Heading, Measure-TableHead, or Cover-election. Sticking to the styles will help keep text consistent across all the pages of the guide (and across multiple guides).
The templates also contain custom styles for Heading 1, Heading 2, and Heading 3 to use within the text. Don’t just manually change the size or make the text bold for emphasis.
Using Heading styles also gives the page a structure that helps with accessibility.
How to choose fonts
The templates use either ClearviewADA or Arial.
The one exception is in template 4 – Candidate Statements. In California, these 200- or 250-word statements must be displayed in the same space and font size. This text uses Calibri, a compact font that fits more letters into a line, while still being easy to read.
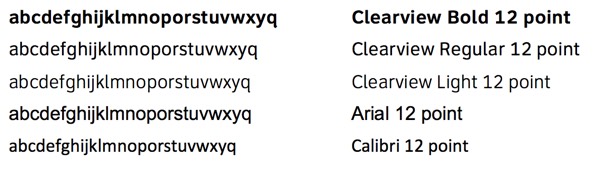
If you are using Clearview, stick to the Light, Regular, and Bold versions of the font.
If you want to use a different font, you can adjust the entire template by changing two styles—Body and Normal—to your desired font. All of the other styles are based on one or the other, so will automatically update to the new font.
How to make images accessible
When placing the image on the page, it is much better to set the text wrapping to “In-Line with Text” so that the image stays with text (and it read in a more logical way by screen readers). This is not always possible, but floating images should be the rare exception.
To be accessible, images need alternative text (called “alt text”) that describes the image for people who can’t see them. To add alt text in Word:
- Right click on the image and select Format Picture
- In the Format Picture dialog, pick the last menu item, Alt Text
- Ignore the Title field, and enter the briefest possible description of the image in the Description field
To write the alt text
- Keep it short
- Repeat any meaningful words in the image
- Explain what the image is saying
- Don’t repeat text in a caption or headline
- You don’t need to say that it’s an image; the software already knows and will indicate that.
→ Learn how to write great alt text (presentation slides)
→ Tips for accessibility
How to place image banners in headers
The civic images library (and the templates) use images as part of the page headers, with text superimposed on them.
To make sure the page banners are always in the same place:
- set the image wrapping to “behind text”
- set the position to the same absolute settings on each page
- set the alt text to say “decorative banner” so it’s clear that there is no information added to the words in the page title.
- use tabs to set the position of the page number and the page title (You will have to adjust the tab for icons of different widths.)
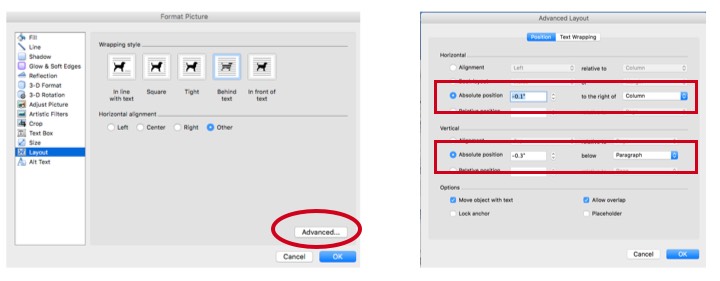
Use the image properties dialogs to set the position of the banner.
How to manage headers and footers
We know. The way Word handles headers so they change from section to section can make you think the file is possessed. But, there’s a secret to being able to add or remove a page without everything breaking, especially those pesky extra pages that show up when the content on the last page just fits.
We’ve made a little demo file to show you how to work around this problem, and when you can change the text or images in the header. The secret is that the “Section Break” marker contains the information for the section before the break, and if that gets deleted, so does the header and footer for that section.
In the templates, we handle the page banners two different ways:
- In the Ways to Vote file, where every page has a different banner, it is placed in the page content. Each one is added right at the top of the page.
- In most of the other files, the banner is in the Word Header area, so that it will repeat on every page. This is especially important for measures, where long blocks of text need to flow from one page to another.
© 2025 Center for Civic Design