Voter guides: Tips for accessibility
Accessibility is part of design.
As so many others have said, making a web page, document, or PDF file that’s accessible has to start at the beginning of the process. This page covers the basics, but you may want to ask an expert to check a sample document to make sure everything works right.
On this page:
- Start with an accessible Word document
- Create an accessible PDF
- Check the PDF for accessibility
- Resources
Start with an accessible Word document
Make sure you have the latest version of Word. Microsoft makes accessibility improvements frequently, so it’s important to have a recent version. You should use at least Office 2013 for the accessibility checker.
The best place to make sure a voter guide is accessible—whether it is distributed as a Web page, in a PDF file, or even in print—is in the original Word or InDesign file.
Use headings, lists, and other structural styles. These styles are built into Word, and can be modified for different visual appearances. The voter guide templates have custom styles. They are important because they tell assistive technology like screen readers about how the information is structured.
Add alternative (alt) text to images. This short text is added in the image properties to explain what the image “says,” or repeat any words that are in the image. Alt text is part of the image properties.
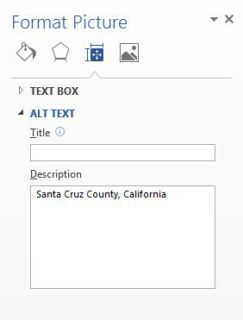
Alt text for the county seal.
Put images inline with text. This keeps them in with the text they appear near, so they are read in the right order
Give tables a heading row. In the table properties, identify the first row as a heading row to help technology navigate through the cells. When the table header row is set correctly, screen readers associate it with the content of the cell.
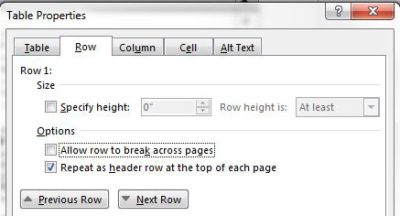
Set the first row to “Repeat as header at the top of each page.”
Use styles for layout. Indenting, columns, background colors, and other layout features will create the visual layout accessibly. Avoid using tables for layout.
Mark the language. If you have a bilingual guide, use Tools > Language to identify sections of the document that are not in English. This helps the spell-checker, but also tells assistive technology when languages switch.
Create an accessible PDF
To get from an accessible Word file to an accessible PDF, you create a tagged PDF file. The goal is to do as little as possible in Acrobat because, frankly, it’s a scarily technical process.
Check the document using the built-in Word accessibility checker. Word for Windows (and soon Word for Mac) in the File tools under Prepare for Sharing and will guide you through fixing any problems. Follow any instructions to fix errors, paying particular attention to alt text for images, and header rows for tables. (Alt text for tables is not read in PDF.)
Save as a PDF. In Word for Windows, this is a simple command on the File menu. Before you save, open the Options and make sure that only following options are checked: document properties, document structure tags, and create bookmarks using headings
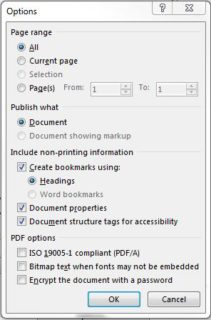
The non-printing information: Bookmarks from headings, properties, and structure tags are all helpful for accessibility. None of the PDF options should be checked.
One of the most important options not to check is “Bitmap text when fonts may not be embedded.” When text is bitmapped, Acrobat breaks it into little pieces, even breaking up word, and treats it like a graphic. It can read the text but only in jerky ways that create a lot of work for anyone using a screen reader.

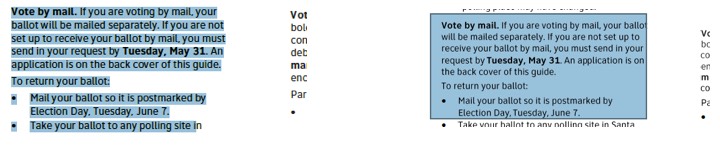
On the left, you can see that Acrobat has broken up a sentence into little chunks of text.
On the right, the whole paragraph is one text element.
This image is what you see when you open the tags pane and highlight a paragraph. This is a good visual check to see if you’ve done it right.
Another way to check the PDF file is to open it in the Acrobat Reader and make sure that you can highlight a text like you are going to cut-and-paste it. Lines and paragraphs should highlight smoothly, not snap to highlight just one word, phrase or line.
Save the file.
Then, move over to Adobe Acrobat (not Reader) for the final steps.
Set the primary language. If your document is only in English, choose English (US) The Document Properties Advanced Tab lets you set the language. For bilingual documents, don’t do this – the languages should already be marked in Word.
Run a last accessibility check. Use Tools > Accessibility > Full Check and follow the directions to fix any problems. If you find problems like missing alternative text that you can fix in Word, it’s better do that than to try to fix them in Acrobat.
Check with a screen reader. If you don’t have this capability in the office, it’s important to have someone check the work, because these programs are not perfect.
Check the PDF for accessibility
As with any accessibility or usability testing, the automated tools are useful, but can only tell you what they can detect. When you set up production for any new document, it’s a good idea to have someone check it carefully with a screen reader and other assistive technology to make sure that the process is producing an accessible file.
Both Microsoft Word and Adobe Acrobat have built in checkers that do a pretty good job at finding basic problems and telling you how to fix them. Your goal is a report that says, “No problems!”
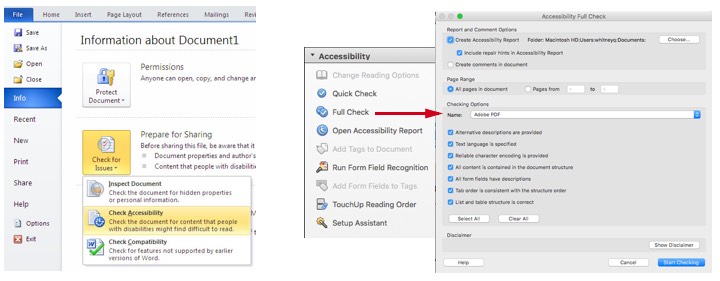
(Left) The Microsoft Word Accessibility Check is in the File Info menu. Use it before you create the PDF file. The checker is in Word for Windows 2010 and later, and soon in Word for Mac.
(Right) The Acrobat Accessibility Full Check is in the Tools Menu.
One easy way to check the file is to see if the text acts like you’d expect text to act. Can you highlight a paragraph, even on a page with two columns of text? Or does the text act more like you are highlighting an area of a graphic. If you can’t highlight and copy the text, a screenreader can’t read it either.
The file on the left has text that a screenreader can ‘see.’ The text on the right is just an image of the words.
Another way to check the accessibility is to use the built-in Read Aloud tool to make sure that everything is reading in the correct order.
The best way, of course, is to have someone who is an expert in accessibility and knows how to use a screen reader check the document to make sure that it behaves well and that all the information is visible to the screen reader.
Resources
A few background articles:
- Accessibility matters — and here’s what we’re doing about it from the team behind the news platform Vox Media
- Personas for accessible UX from the book, A Web for Everyone
- How People with Disabilities Use the Web, an overview and links to information about people and the technology they use from the Web Accessibility Initiative
Deeper information
- Accessible Digital Office Document (ADOD) Project – detailed instructions for versions of Word and other word processors
- Cheatsheets for Office and Adobe tools – Great one-pagers from NSCAE
- Writing great alt text – a how-to presentation
- Make your presentations accessible – a how-to for slides
- Demystifying accessibility testing
- Metzessible PDF/UA Series – part of series of instructional videos in step-by-step detail. Jump to the end of this video (about 35:30) for the steps to create a tagged PDF in Word.
© 2025 Center for Civic Design